A DIY Guide to Creating Your Own Desktop Terrarium
Building a desktop terrarium for your home or office helps reduce stress levels and makes you feel happier.
Studies prove that including green spaces in your home and work environments also increases your ability to pay attention. By focusing on the plant rather than browsing the web when you need a work break, you end up feeling more rested and ready to focus.
Learn how to build a beautiful open terrarium below to improve your quality of life along with your workspace.
Materials You Need to Make a Desktop Terrarium
Depending on the type of terrarium you decide to build, the materials may change. The following materials list will let you build a basic open desktop terrarium:
- Clean, glass jar or container with an opening large enough to fit your hand through to put plants inside
- Small rocks or stones (pebbles, gravel, broken pottery pieces, sea glass, etc.)
- Activated charcoal or potting charcoal
- Sand
- Soil appropriate for plant species chosen for the terrarium
- Small plants
- Spoon, scoop, or tiny shovel
- Scissors
- Gloves (optional)
- Funnel (optional)
- Kitchen tongs or chopsticks (optional)
- Sphagnum moss (optional, but suggested)
Common Plants for DIY Terrariums
Before you decide what plants to include, take a quick look at the most common terrarium plants and the specific growing requirements for each.
Air Plants
Many DIY terrariums use air plants from the genus Tillandsia since they come in many different species. These prefer lots of bright, indirect sunlight and need supplemental growing lamps if put in a dark place.
They also prefer the temperature to be at least 50F or higher and need a 30-minute soak in water a few times a week depending on the climate. They prefer humidity, so feel free to mist them in-between their water baths.
Rooted Plants
When choosing a rooted plant to place in your desktop terrarium, you need to pick one that can handle the lack of drainage and humidity. Remember rooted plants require slightly more maintenance than air plants, so follow the instructions included on the plant label.
Cacti
Cacti seem like they would function well in a terrarium. However, the lack of air circulation, their need for full sunlight, and no water drainage make them a poor choice. They will do well at first, but will usually die over the next few months.
How to Make an Open Desktop Terrarium
Making a beautiful DIY terrarium for your desk at home or work will take no time at all by following these simple steps.
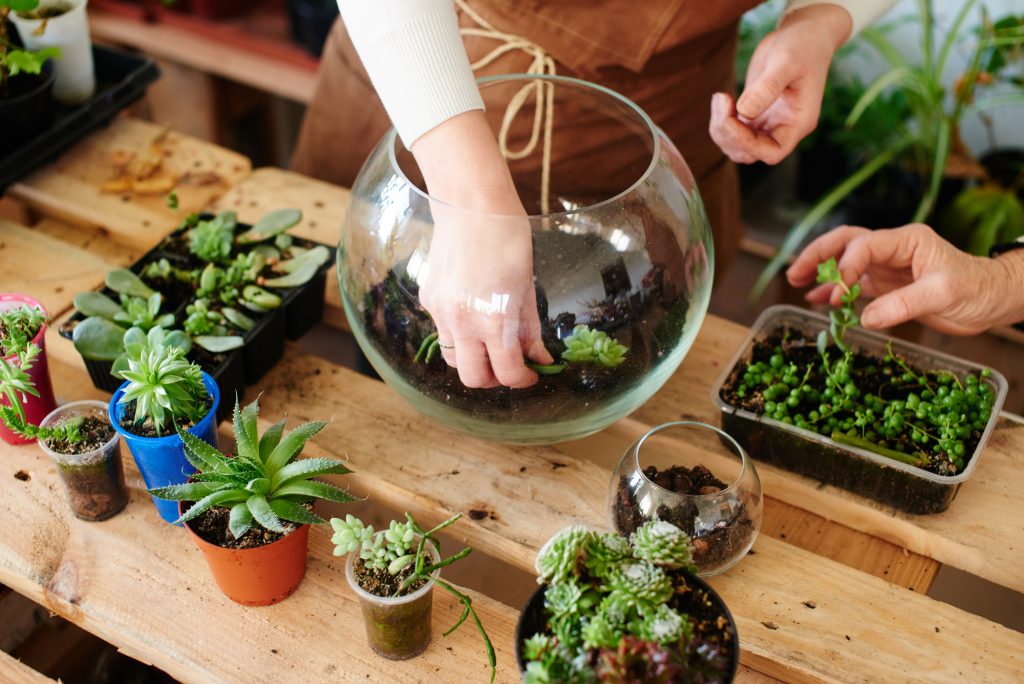
Step 1: Choose a Glass Container
Find a clear glass container to house your plants. It doesn’t need to be a stylish vintage vase. An old pickle jar will work just as well. Whatever you choose, remember to pick a clear glass container to allow as much light in as possible, so the plants grow well.
Step 2: Prepare the Container
Once you choose a container, clean it thoroughly to prevent any unwanted residues from affecting the growth of your plants. Remove any stickers or price tags if you purchased a new container. Soak old jars in hot water and distilled white vinegar to remove the sticky, outside label. Dry the jar well before beginning to build the layers.
Step 3: Create the Drainage Layer
The first layer, the drainage layer, prevents the plants’ roots from rotting when extra water collects at the bottom of the jar. Make it from small pebbles, gravel, or sea glass as long as the rocks will not retain water. Aim for at least an inch and a half of gravel.
Be sure to sprinkle activated charcoal on top of the drainage layer to absorb any decomposition odors and keep your desktop terrarium fresh. Wet the charcoal before adding it on top of the gravel to prevent black dust from clinging to the glass. You can also include activated charcoal in the gravel mix with a ratio of one-quarter charcoal to three-quarters gravel.
Step 4: Add a Protective Layer (Optional)
Adding a protective layer between the soil and the gravel is not necessary, but a smart idea. It will stop the soil from slowly washing into the drainage layer, rendering it pointless.
Pick up some fine-grade plastic screens, recycle a pair of nylon stockings, or choose moss for a natural alternative. Simply pick any type of non-compostable material that allows water to pass through, but not soil.
Step 5: Create the Soil Layer
Build the soil layer next. Choose a great growing medium appropriate for the types of plants selected for the desktop terrarium. A good example for most plants would be two parts sandy, loose potting soil to one part perlite and one part peat moss.
Moisten the soil mixture before placing it inside. To test if it is the right saturation, squeeze a handful of the soil. If no water trickles out, but it feels moist, it should be good.
Place the soil layer on top of the protective or gravel layer. Do not fill the soil up more than one-quarter the depth of the jar. Use a funnel or spoon to put the soil inside the container.
Step 6: Decorate the Container
Next, place rocks, driftwood, figurines, or other decorative items in the terrarium to build a little landscape. Ensure that all items you put in the container have been carefully cleaned to avoid introducing any diseases that may affect the health of your plants.
Step 7: Plant the Plants
Now comes the fun part! Assemble your desktop terrarium with the chosen plants. Use your spoon to move around soil and make space to plant. Do not overcrowd the plants at first if you do not know how they will grow.
Once finished planting, place a thin layer of sphagnum moss over any exposed soil to prevent splashing onto the walls while water. It also makes it look more put together.
Step 8: Care for the Plants
Water the plants right away to minimize the transplant shock. Do not overdo since you only have the drainage layer and no holes for the water to escape the terrarium.
How to Maintain Your DIY Terrarium
An open terrarium needs watering only one to two times per week. Use distilled water, not tap water, to prevent calcium deposits from building up on the glass. You can mist an open, desktop terrarium daily to keep the humidity levels high.
Water your live plants about one to two times per week or follow the instructions on the plant’s tag. The soil should always have at least a little moisture in an open terrarium. It should never get completely dry.
Avoid watering the mosses, if possible, and mist a moss-only terrarium once every few weeks. A closed terrarium will almost never need water. Look for condensation on the glass walls indicating proper humidity.
Place your terrarium in a safe spot with natural, indirect sunlight. Do not put it in direct sunlight or a very hot area since the foliage may burn if it touches the sides of the container.
Do You Love DIY Projects?
Now that you know how to build a desktop terrarium from scratch, you can imagine how easy it will be to do other DIY projects!
Check out one of our many, easy-to-follow DIY guides perfect for projects inside or outside your home.